Your clothes take forever to dry. The laundry room feels like a sauna. You catch a whiff of something burning during a load. These aren’t just annoying inconveniences, they’re warning signs that your dryer vent needs immediate attention.
A clogged dryer vent isn’t just inefficient, it’s dangerous. According to the National Fire Protection Association, dryers cause about 13,820 home fires annually, with failure to clean being the leading factor. The silver lining? Most dryer vent cleaning is simple enough to handle yourself with basic tools and an hour of your time.
Warning Signs Your Dryer Vent Needs Cleaning
Recognizing the early signs of a clogged vent can save you from costly repairs or worse. Your dryer will tell you when it’s struggling if you know what to look for.
Clothes taking longer than one cycle to dry completely is the most common indicator. Normal loads should finish in 30-40 minutes. If you’re running two or three cycles for items that used to dry in one, your vent is likely restricted.
The outside of your dryer getting extremely hot during operation signals poor airflow. You shouldn’t be able to fry an egg on your dryer’s surface. Excessive heat also damages your clothes and shortens your dryer’s lifespan.
A burning smell during operation requires immediate attention. Turn off the dryer and unplug it right away. This odor often comes from lint buildup getting too hot near the heating element.
Other telltale signs include lint accumulating around the dryer door seal, humid air in the laundry room during operation, and the outside vent flap not opening when the dryer runs. If you notice any combination of these symptoms, it’s time to clean.
Tools and Materials You’ll Need
Gathering the right equipment before starting makes the job much smoother. Most homeowners already have several of these items on hand.
A dryer vent cleaning kit is your primary weapon. These kits include flexible rods that connect together and rotating brushes designed specifically for vent cleaning. The brush heads come in different sizes to match various vent diameters.
Dryer Vent Cleaning Kit with Flexible Rods
Essential tool that includes everything needed for thorough vent cleaning with extendable rods for long runs
You’ll also need a cordless drill to spin the brush attachment, though some kits include manual handles if you prefer not to use power tools. A vacuum cleaner helps remove loose lint from both ends of the vent system.
Additional items include screwdrivers for disconnecting the vent hose, work gloves to protect your hands, and a flashlight or headlamp for better visibility. Having a drop cloth or old towels nearby prevents lint from spreading across your floors.
For external vent cleaning, you might need a ladder to safely reach roof-mounted vents. Never attempt roof work if you’re uncomfortable with heights or if weather conditions aren’t ideal.
Step-by-Step DIY Cleaning Process
Proper preparation prevents problems and ensures thorough cleaning. Start by unplugging your dryer and, if it’s gas-powered, shutting off the gas supply. Let the unit cool completely if it was recently used.
Disconnect and Access the Vent
Pull your dryer away from the wall to access the rear vent connection. Most dryers connect via a flexible duct secured with a hose clamp or metal tape. Remove the clamp and carefully disconnect the duct from both the dryer and the wall outlet.
Check the flexible duct itself for damage, excessive lint buildup, or crushing. Replace it if it’s damaged or if it has rigid ridges that trap lint easily. Smooth-walled metal ducts perform better than flexible plastic or foil versions.
Clean out any visible lint from the dryer’s exhaust port using your vacuum’s hose attachment. This area often accumulates significant buildup that restricts airflow.
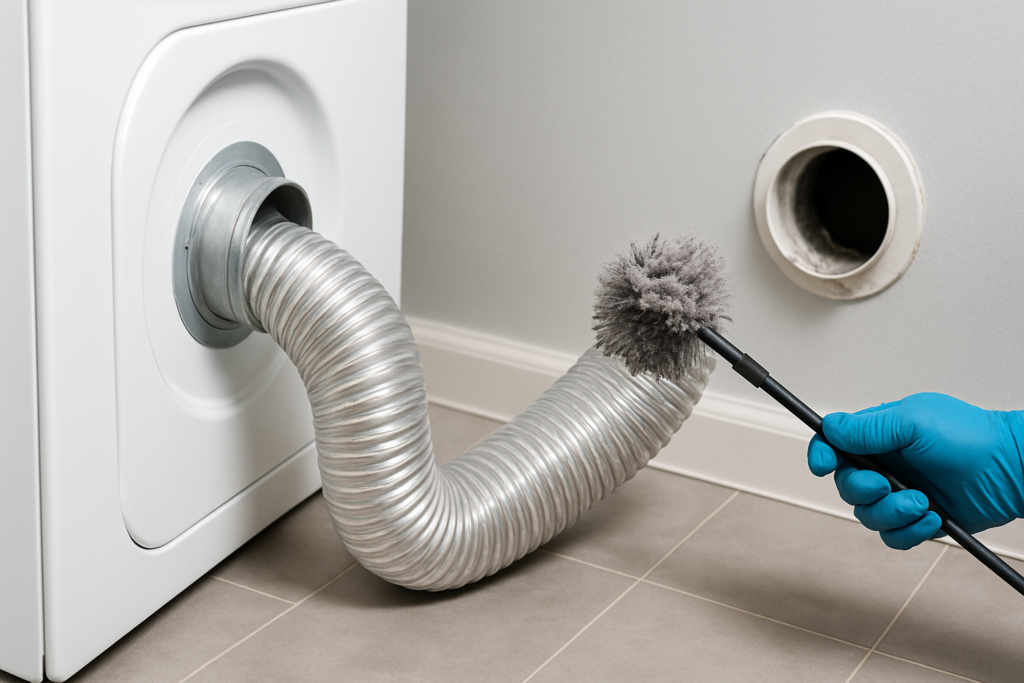
Clean from the Inside
Insert your cleaning brush into the wall vent opening. Connect additional rod sections as needed to reach through the entire vent run. Most residential vents range from 10 to 25 feet, but some can extend much longer.
Use your drill on a slow speed setting to rotate the brush while gradually pushing it through the vent. The spinning action loosens packed lint while the brush bristles scrape the vent walls clean. Work slowly to avoid jamming the brush or breaking rod connections.
Cordless Drill for Dryer Vent Cleaning
Variable speed control is crucial for safe and effective vent brush operation
Gradually pull the brush back while continuing to rotate it. This action pulls loosened lint toward the interior opening where you can vacuum it up. You’ll be amazed at how much debris comes out of seemingly clean vents.
Clean from the Outside
Locate your exterior vent opening and remove the cover if possible. Most covers lift off or unscrew easily, though some require removing screws or clips. Clean the cover separately with warm soapy water.
Insert your brush from the exterior end and repeat the cleaning process. Working from both directions ensures complete removal of stubborn blockages. Pay special attention to the exterior opening, as this area often accumulates lint mixed with outdoor debris.
Check that the exterior flap moves freely when you blow air through it. Stuck flaps prevent proper airflow and allow outdoor air, moisture, and pests into your vent system.
How Often Should You Clean Your Dryer Vent
Cleaning frequency depends on several factors, but annual cleaning works for most households. Families doing multiple loads daily or those with pets that shed heavily should clean every six months.
The length and configuration of your vent run also affects cleaning frequency. Longer runs with multiple turns trap lint more readily than short, straight vents. Vents longer than 15 feet or those with several 90-degree bends need more frequent attention.
Commercial dryer sheets and fabric softeners leave residue that helps lint stick to vent walls. If you use these products regularly, consider more frequent cleaning or switching to wool dryer balls as an alternative.
Keep a simple log noting when you clean your vent and any issues you discover. This record helps you identify patterns and adjust your cleaning schedule accordingly. Mark your calendar or set a phone reminder so you don’t forget.
Professional vs DIY: When to Call the Experts
Most single-story homes with accessible vents are perfect DIY candidates. Straight runs under 20 feet pose few challenges for homeowners with basic tool skills.
Complex vent systems warrant professional attention. Multi-story homes, vents that travel through multiple rooms or floors, and systems with multiple turns or booster fans require specialized equipment and expertise.
Roof-mounted vents present safety concerns for many homeowners. Professional cleaners have proper ladder safety equipment and insurance coverage for roof work. The cost of professional cleaning often outweighs the risks of DIY roof access.
Signs that professional help is needed include inability to push your cleaning brush through the entire vent, discovering damaged ductwork during cleaning, or finding the exterior vent completely blocked with debris.
Professional cleaning typically costs between competitively priced-200 for standard homes, while severe blockages or repairs can cost more. Compare this to potential fire damage or dryer replacement costs when making your decision.
Additional Safety and Maintenance Tips
Regular lint trap cleaning after every load prevents most vent problems. Even minor lint accumulation in the trap forces your dryer to work harder and allows more debris to enter the vent system.
Avoid overloading your dryer, which creates more lint and reduces air circulation. Properly sized loads dry more efficiently and generate less debris. Remove tissues, paper, and other items from pockets before washing to prevent additional lint creation.
Install a lint alarm or dryer vent monitor if your vent system is particularly long or complex. These devices alert you when airflow drops below safe levels, indicating it’s time for cleaning.
Dryer Vent Alarm Monitor
Provides early warning when airflow restriction reaches dangerous levels
Replace flexible transition ducts every few years, as they deteriorate and collect lint more readily than rigid metal ducts. Upgrade to smooth-walled metal ducts when possible for improved airflow and easier cleaning.
Never ignore unusual noises, smells, or performance changes from your dryer. These early warning signs are much easier and cheaper to address than emergency repairs or fire damage.
Frequently Asked Questions
Can I use a leaf blower to clean my dryer vent?
While some people use leaf blowers for vent cleaning, this method isn’t recommended. Leaf blowers can damage delicate vent components, push lint deeper into the system, or create dangerous pressure buildup. Professional brush cleaning removes lint more effectively and safely.
How do I know if my dryer vent is too long?
Most dryer manufacturers specify maximum vent lengths in their installation manuals, typically 25-35 feet for straight runs. Subtract 5 feet for each 90-degree turn in the vent path. Longer vents require booster fans or more frequent cleaning to maintain proper airflow.
Should I clean my dryer vent if it’s brand new?
New dryer installations should be inspected but rarely need immediate cleaning. However, construction debris, installation materials, or damaged ductwork during installation can restrict airflow. A quick inspection ensures proper installation and establishes a baseline for future maintenance.
What’s the difference between the lint trap and the dryer vent?
The lint trap is the removable screen inside your dryer door that catches most lint during operation. The dryer vent is the ductwork that carries hot air and remaining lint from your dryer to the outside of your home. Both need regular cleaning, but the vent requires less frequent but more thorough maintenance.
Energy Savings and Performance Benefits
A clean dryer vent dramatically improves your dryer’s efficiency. Restricted airflow forces your dryer to run longer cycles, sometimes doubling energy consumption for the same results.
Improved airflow also extends your dryer’s lifespan by reducing strain on the heating element, motor, and other components. Many dryer repairs stem from overheating caused by poor ventilation rather than normal wear and tear.
Clean vents also protect your clothes from over-drying and heat damage. Proper airflow allows moisture sensors to work correctly, automatically stopping cycles when clothes reach the desired dryness level.
The time savings alone justify regular vent cleaning. Clothes that dry in one cycle instead of two or three free up your schedule and reduce wear on fabrics from excessive tumbling.
Taking control of your dryer vent maintenance protects your home, saves money on energy bills, and ensures your dryer operates safely for years to come. The small investment in cleaning tools and annual maintenance pays dividends in safety, efficiency, and equipment longevity.
This article contains affiliate links. We may earn a small commission at no extra cost to you.