Few home maintenance issues are more frustrating than discovering your water heater won’t drain when you need it to. Whether you’re trying to flush out sediment, replace a faulty heating element, or prepare for a repair, a stubborn water heater can turn a simple task into an all-day headache. The good news is that most drainage problems have straightforward solutions you can tackle yourself.
Understanding why your water heater refuses to cooperate is the first step toward fixing it. In most cases, the culprit is sediment buildup, a faulty drain valve, or issues with your home’s plumbing configuration. Let’s walk through the common causes and how to get that water flowing again.
Sediment Buildup Is Usually the Main Culprit
Minerals in your water supply gradually accumulate at the bottom of your tank over time. Calcium, magnesium, and other deposits create a thick layer that can completely block the drain valve opening. This is especially common in areas with hard water.
When sediment packs tightly around the drain valve, water simply can’t flow through the small opening. You might get a trickle at first, then nothing. The problem gets worse with age, which is why water heaters that haven’t been flushed in years are particularly prone to this issue.
To clear sediment from the drain path, try opening and closing the drain valve several times rapidly. This agitation can sometimes break up the blockage enough to get water moving. You can also try opening the valve fully and using a long screwdriver or stiff wire to carefully poke through the valve opening to dislodge packed sediment.
Another effective technique is to open both the drain valve and the temperature and pressure relief valve at the top of the tank. This creates better flow and can help flush out stubborn deposits. Just make sure you have a hose attached and directed to an appropriate drain location first.

Water Heater Drain Pan
Protects your floor from leaks during draining and ongoing use
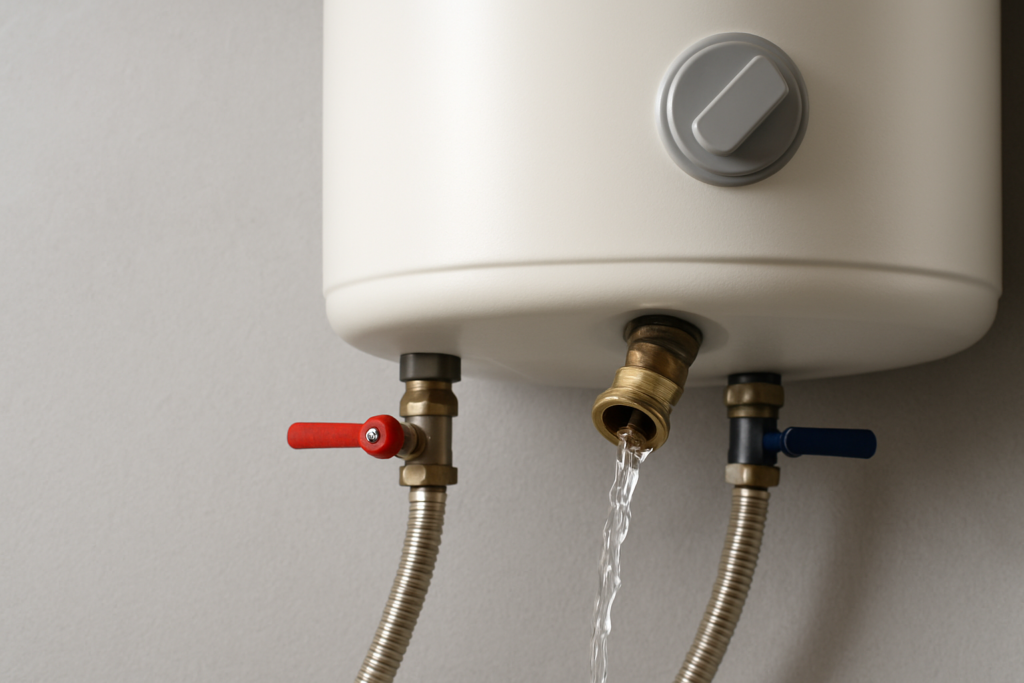
The Drain Valve Itself Might Be Faulty
Plastic drain valves on many residential water heaters are notorious for failing. They crack, the threads strip, or the internal mechanism breaks down. Even brass valves can develop problems over time, especially if they haven’t been opened in years.
Check whether water leaks around the valve itself when you open it. This indicates the valve housing is damaged rather than just clogged. You might also notice the valve handle won’t turn fully or feels stripped.
Replacing a drain valve isn’t difficult, but it does require draining at least some of the tank first. You can do this by shutting off the water supply and siphoning water out through the temperature and pressure relief valve using a hand siphon pump. Once the water level drops below the drain valve, you can unscrew the old valve and install a new one.
For the replacement, go with a full-port brass valve rather than the standard plastic ones. They cost a bit more but open wider and last much longer. Make sure to apply thread tape or pipe dope to create a proper seal when installing the new valve.
Your Hose or Drain Line Could Be Blocked
Sometimes the water heater drains just fine, but the hose you’ve attached is the actual problem. Garden hoses can kink, develop internal collapses, or have debris blocking them. Even a small restriction in the hose will slow drainage to a crawl.
Disconnect your hose and check whether water flows freely from the drain valve. If it does, you’ve found your problem. Inspect the hose for kinks, crush damage, or anything stuck inside. Try flushing the hose with water from a spigot to clear any blockages.
For draining water heaters, a heavy-duty garden hose works better than cheap lightweight versions. The thicker walls resist kinking and crushing. Some people prefer using a short section of rigid pipe attached to the drain valve, then connecting the hose further away from the tank where it can lay flat without sharp bends.
Check for Airlock and Vacuum Issues
Water heaters need air to enter the tank as water drains out. Without proper venting, a vacuum forms inside the tank that prevents drainage. This is basic physics, like putting your thumb over a straw.
The simplest solution is opening a hot water faucet somewhere in your house. This breaks the vacuum and allows air into the system through the plumbing. Pick a faucet on an upper floor if you have a multi-story home, as this provides the best venting effect.
You can also open the temperature and pressure relief valve on top of the water heater. Lift the lever to allow air in while you’re draining. Just be prepared for some water to come out of this valve initially, especially if the tank is full and pressurized.

Water Heater Element Wrench
Essential tool if you need to remove elements while troubleshooting drainage issues
Drain Valve Position and Sediment Pockets
On some water heaters, the drain valve sits slightly above the absolute bottom of the tank. This design leaves a pocket where sediment collects and never fully drains. Frustrating, but common.
You can’t change the valve position, but you can work around it. After draining as much as possible through the valve, try rocking the tank gently if it’s a smaller unit. This sloshes sediment toward the drain opening. For larger tanks that you can’t move, opening the cold water inlet briefly while the drain is open can create turbulence that stirs up settled sediment.
Another approach is to remove one of the heating elements instead of relying solely on the drain valve. The element ports are larger and positioned differently on the tank, often allowing better drainage. You’ll need a water heater element socket and breaker bar for this job. Make sure the power is off and the tank pressure is released first.
When the Problem Is Beyond the Tank
Occasionally, the issue isn’t your water heater at all but rather where you’re trying to drain it. If your drain destination is at the same level or higher than the water heater, gravity won’t help you. The water simply won’t flow uphill.
Basement water heaters usually drain fine to a floor drain. But if you’re trying to drain through a hose that runs upward before going down, you’ve created a siphon break. The water reaches the high point and stops.
For situations where gravity won’t work, you need a utility transfer pump. These small pumps connect to your drain valve and actively pump water to wherever you need it to go. They’re particularly useful for water heaters in crawl spaces or unusual installations where the drain destination is above the tank level.
Preventive Maintenance Makes Future Draining Easier
The best way to avoid drainage headaches is flushing your water heater regularly. Annual flushing prevents heavy sediment buildup that leads to most drainage problems. You don’t need to do a complete drain, just running several gallons out through the drain valve helps.
During these maintenance flushes, keep draining until the water runs clear rather than cloudy or filled with visible sediment. This might take 5 to 10 gallons depending on your water quality. Make it a habit to open and close the drain valve a few times even when you’re not doing a full flush. This keeps the valve mechanism working freely.
Consider installing a water softener if you have hard water. While softeners have their own maintenance requirements, they dramatically reduce mineral buildup in your water heater and extend its lifespan. The reduction in sediment makes draining much easier when you need to do it.

Calcium and Lime Remover
Excellent for dissolving mineral deposits in drain valves and around heating elements
Safety Considerations When Draining Your Water Heater
Before you start any drainage work, shut off power to an electric water heater at the breaker box. For gas units, turn the gas valve to the pilot position. Never drain a water heater while the heating elements or burner are active, as this can cause serious damage.
The water coming out will be hot, potentially scalding hot. Let the tank cool for several hours before draining, or be extremely careful with hose placement and keep people and pets away from the drainage area. Draining into a bucket requires extra caution since hot water and steam can splash.
Wear gloves and eye protection, especially if you’re working with the drain valve or trying to clear blockages. Sediment-filled water can squirt out unexpectedly when you finally break through a clog.
Frequently Asked Questions
How long should it take to drain a 40-gallon water heater?
With a fully functioning drain valve and good water pressure, a 40-gallon tank should drain in about 20 to 30 minutes. If it’s taking significantly longer, you likely have sediment buildup restricting flow. A completely clogged drain valve will prevent any drainage at all. Using a larger diameter hose and ensuring it has a clear downward path helps maximize drainage speed.
Can I use a shop vac to help drain my water heater?
Yes, a wet/dry shop vacuum can help in certain situations. You can use it to suck water out through the temperature and pressure relief valve if the drain valve is completely blocked. However, this method is slow and you’ll need to empty the vacuum frequently. It works better as a last resort for getting enough water out to replace the drain valve rather than for draining the entire tank.
Why does water keep running after I close the drain valve?
A valve that won’t fully close typically has sediment stuck in the valve seat or a damaged internal mechanism. Try opening and closing it rapidly several times to dislodge any debris. If that doesn’t work, the valve needs replacement. As a temporary fix, you can attach a hose with a shut-off valve on the end, but plan to replace the water heater’s drain valve soon to prevent ongoing leaks.
Is it normal for sediment to come out looking like sand or small rocks?
Absolutely. In areas with hard water, the calcium and magnesium deposits can form chunky, sand-like particles or even small rock-hard pieces. This is exactly what you want to flush out during maintenance. The amount and size of sediment depends on your water quality and how long it’s been since the last flush. Heavy sediment like this is why regular flushing matters so much for water heater longevity.
This article contains affiliate links. We may earn a small commission at no extra cost to you.