Winter’s arrival brings cozy fireplaces and hot cocoa, but it also threatens your home’s plumbing system. Frozen pipes can burst and cause thousands in water damage, turning your warm sanctuary into an expensive nightmare. The silver lining is that protecting your pipes doesn’t require a major investment or professional contractor.
You can safeguard your plumbing system with simple techniques and affordable materials available at any hardware store. From proper insulation to strategic heat application, these proven methods will keep water flowing smoothly through even the harshest cold snaps.
Let’s explore practical, budget-friendly solutions that protect your pipes while keeping your utility bills manageable.
Identifying Your Most Vulnerable Pipes
Not all pipes face equal freezing risk. Exterior walls house the most vulnerable plumbing, especially on the north side of your home where sunlight rarely reaches. Crawl spaces, unheated basements, and garages create perfect conditions for frozen pipes.
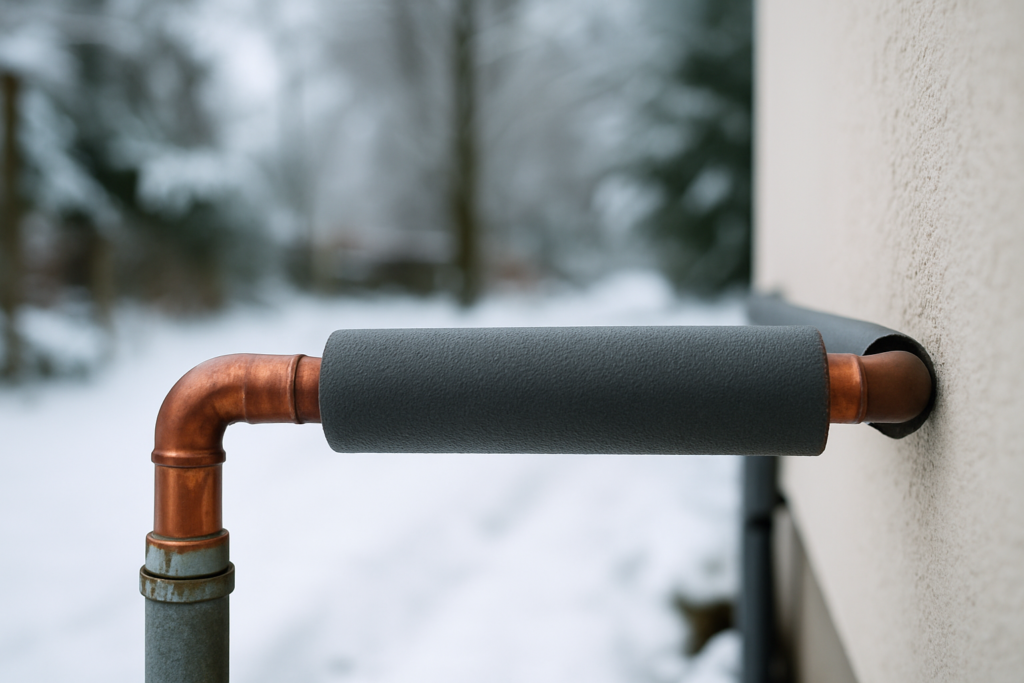
Check areas where pipes run through uninsulated spaces or near exterior walls. Pay special attention to water supply lines serving outdoor faucets, as these often lack adequate protection. Kitchen and bathroom fixtures on exterior walls deserve extra attention during your inspection.
Pipes in areas with minimal air circulation freeze faster than those in well-ventilated spaces. Look for plumbing that runs through tight corners or cramped spaces where warm air can’t reach effectively.
Insulation Materials That Actually Work
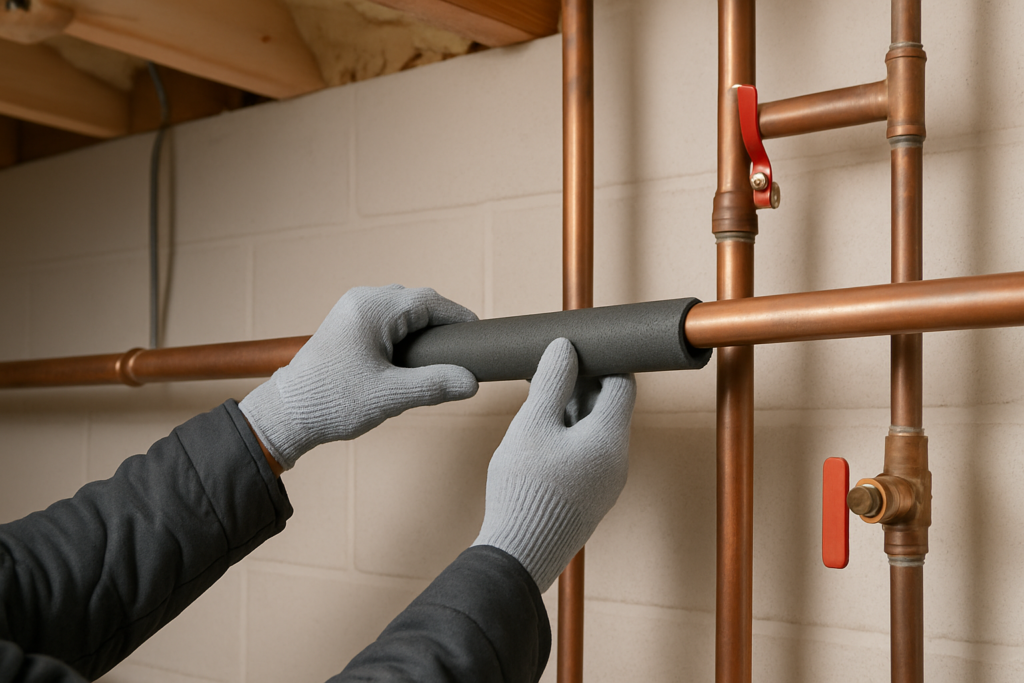
Foam pipe insulation offers the best bang for your buck. These pre-slit tubes slide easily over pipes and provide excellent thermal protection. Choose insulation with a wall thickness of at least half an inch for optimal results.
Fiberglass pipe wrap works well for irregular pipe configurations where foam tubes won’t fit properly. Wrap it around joints, elbows, and valves that standard insulation can’t cover. Secure with electrical tape or zip ties every few inches.
Frost King Pre-Slit Foam Pipe Insulation
Affordable foam insulation that fits most standard pipe sizes and installs without tools
Reflective bubble insulation provides superior protection in extremely cold climates. This material combines reflective foil with insulating bubbles, creating a barrier that reflects heat back toward pipes while blocking cold air infiltration.
For pipes in tight spaces, consider self-adhesive foam tape. While not as effective as full tube insulation, it’s better than leaving pipes completely exposed. Apply multiple layers for improved thermal protection.
Heat Tape Application Done Right
Electric heat tape prevents freezing by providing consistent warmth along pipe lengths. Choose self-regulating heat tape that adjusts output based on temperature, preventing overheating and reducing energy consumption.
Install heat tape along the bottom of pipes where cold air settles. Avoid overlapping sections, which can create hot spots and potential fire hazards. Follow manufacturer spacing requirements religiously.
Plug heat tape into GFCI-protected outlets only. These circuits shut off power if they detect electrical problems, preventing dangerous situations. Test GFCI outlets monthly during winter to ensure proper function.
WRAP-ON Pipe Heating Cable
Self-regulating heat cable that prevents overheating and works efficiently in varying temperatures
Cover heat tape with insulation after installation. The insulation traps generated heat around pipes while protecting the heating element from damage. Never install heat tape over existing insulation.
Strategic Faucet Dripping Techniques
Moving water resists freezing better than static water in pipes. Open faucets to a pencil-thin stream when temperatures drop below 20°F. This small flow prevents ice formation in supply lines.
Focus on faucets connected to exposed pipes or those on exterior walls. You don’t need to drip every faucet in your house, just those serving vulnerable areas. Kitchen sinks on outside walls often need this treatment.
Open both hot and cold taps slightly to protect both supply lines. If you have a single-handle faucet, position it to allow both hot and cold water to flow. This technique protects your entire plumbing system.
The slight increase in water usage costs far less than repairing burst pipes. Most homeowners see only a few dollars added to their water bill, while pipe repairs can cost hundreds or thousands.
Smart Thermostat Settings for Pipe Protection
Maintain indoor temperatures above 55°F even when traveling. Many homeowners make the mistake of setting thermostats too low during vacations, only to return to burst pipes and water damage.
Consistent temperatures work better than dramatic swings. Avoid setting back your thermostat more than 5-7 degrees at night. The energy savings aren’t worth the increased freezing risk during extreme cold spells.
Open cabinet doors under sinks during cold nights. This allows warm room air to circulate around pipes hidden behind cabinets. Kitchen and bathroom cabinets on exterior walls benefit most from this simple technique.
Consider installing a smart thermostat with vacation mode settings. These devices can monitor outdoor temperatures and adjust indoor settings automatically to prevent freezing while you’re away.
Emergency Thawing Methods
If you discover a frozen pipe, act quickly but safely. Turn off water at the main shutoff valve to prevent flooding when ice melts. Locate the frozen section by feeling along the pipe for unusually cold spots.
Use a hair dryer to apply gentle heat, starting from the faucet end and working toward the frozen area. Keep the dryer moving to prevent overheating any single spot. This method works well for accessible pipes.
Wrap frozen pipes with warm, wet towels for a gentler approach. Replace towels as they cool down. This technique takes longer but reduces the risk of pipe damage from excessive heat.
Andis Professional Hair Dryer
Powerful hair dryer that generates consistent heat for emergency pipe thawing
Never use open flames, propane torches, or other high-heat sources. These can damage pipes, start fires, or cause injuries. Stick to controlled heat sources like hair dryers or heating pads designed for plumbing use.
Call a professional if you can’t locate the frozen section or if pipes remain frozen after several hours of thawing attempts. Some situations require specialized equipment or expertise to resolve safely.
Creating Warm Air Circulation
Small space heaters can protect pipes in crawl spaces and basements during extreme cold. Choose units with automatic shutoff features and tip-over protection. Never leave space heaters unattended.
Install exhaust fans to move warm air from heated spaces into areas with exposed pipes. Bathroom exhaust fans can push warm air into adjacent crawl spaces through small openings.
Seal air leaks around pipes where they enter your home. Cold air infiltration through these gaps can freeze pipes even in heated spaces. Use expanding foam or caulk to close these openings.
Budget-Friendly Prevention Strategies
Newspaper and old towels can provide emergency insulation when proper materials aren’t available. Wrap exposed pipes with several layers and secure with duct tape. This temporary solution works for short cold snaps.
Pool noodles from dollar stores make surprisingly effective pipe insulation. Cut a slit along one side and slip over pipes. While not as efficient as purpose-made insulation, they’re much better than nothing.
Group multiple pipes together and insulate them as a bundle. This technique reduces the amount of insulation material needed while creating a warmer microenvironment around your plumbing.
Duck Brand Heavy-Duty Duct Tape
Strong adhesive tape perfect for securing makeshift pipe insulation and sealing air leaks
Check with local utilities for winterization assistance programs. Many companies offer free or discounted insulation materials and energy audits during winter months. These programs can significantly reduce your protection costs.
Long-term Solutions
Relocate vulnerable pipes during renovations when possible. Moving supply lines away from exterior walls eliminates freezing risk permanently. This approach works well during kitchen or bathroom remodels.
Install frost-free outdoor faucets to replace standard hose bibs. These fixtures have shutoff valves located inside heated spaces, preventing freeze damage. Professional installation typically pays for itself within a few years.
Add insulation to walls containing plumbing lines. This upgrade improves both freeze protection and energy efficiency. Focus on north-facing walls and areas with minimal existing insulation.
Frequently Asked Questions
How cold does it need to be before pipes freeze?
Pipes typically freeze when temperatures drop to 20°F or below for several hours. However, pipes in unheated areas can freeze at higher temperatures, especially with wind chill. Exposed pipes on exterior walls may freeze when outdoor temperatures reach 32°F if indoor heating is inadequate.
Should I shut off water to my house when traveling in winter?
Shutting off the main water supply provides extra protection during extended absences. Turn off the main valve and drain faucets, but keep your thermostat set above 55°F. This prevents both freezing and potential flooding from undetected leaks while you’re away.
Can I use a space heater to warm pipes in my crawl space?
Electric space heaters can warm crawl spaces safely if used properly. Choose units with automatic shutoff and tip-over protection. Ensure adequate clearance from combustible materials and never leave them unattended. Consider installing permanent heating solutions for recurring problems.
What should I do if my pipes freeze despite taking precautions?
Turn off your main water supply immediately to prevent flooding when ice melts. Apply gentle heat using a hair dryer or warm towels, starting from the faucet end. Never use open flames or high-heat sources. Call a professional if you can’t locate the frozen area or if pipes remain frozen after several hours.
This article contains affiliate links. We may earn a small commission at no extra cost to you.