There’s nothing worse than opening your freezer to find partially thawed ice cream or realizing your frozen groceries are starting to feel soft. When your freezer isn’t cooling properly, it’s not just an inconvenience. You’re looking at potentially hundreds of dollars in wasted food and the looming expense of repairs or replacement.
Before you panic and call a repair technician, you should know that many freezer cooling issues have simple causes. Most problems come down to restricted airflow, dirty condenser coils, or failing components that you can often troubleshoot yourself. Let’s walk through the most common culprits and what you can do about them.
Blocked Air Vents and Overloading
Your freezer relies on consistent air circulation to maintain proper temperatures. When you pack it too full or accidentally block the vents, cold air can’t circulate properly. This is especially common in chest freezers where people tend to stack items right up to the lid.
Check the back and sides of your freezer interior for air vents. These are usually small grills or openings where cold air enters. Make sure nothing is pressed directly against them. You should leave at least an inch of clearance around all vents.
The same principle applies to the exterior. Your freezer needs space to breathe. If it’s pushed flush against a wall or surrounded by cabinets, the compressor can overheat and struggle to cool effectively. Pull it out a few inches and see if performance improves over the next 24 hours.
Dirty or Frozen Condenser Coils
Condenser coils are the thin metal tubes usually located on the back or bottom of your freezer. They release heat from inside the unit, which is essential for the cooling cycle. When these coils get covered in dust, pet hair, or grime, they can’t release heat efficiently.
Unplug your freezer and locate the coils. You’ll probably find them coated in a surprising amount of dust if you haven’t cleaned them recently. Use a refrigerator coil brush to gently remove debris, then vacuum up what falls to the floor.

Refrigerator Coil Cleaning Brush
A specialized brush makes cleaning tight coil spaces much easier than generic tools.
For freezers with coils underneath, you might need to remove a panel or grille first. Check your owner’s manual for specific instructions. This maintenance task should be done every six months, or more often if you have pets.
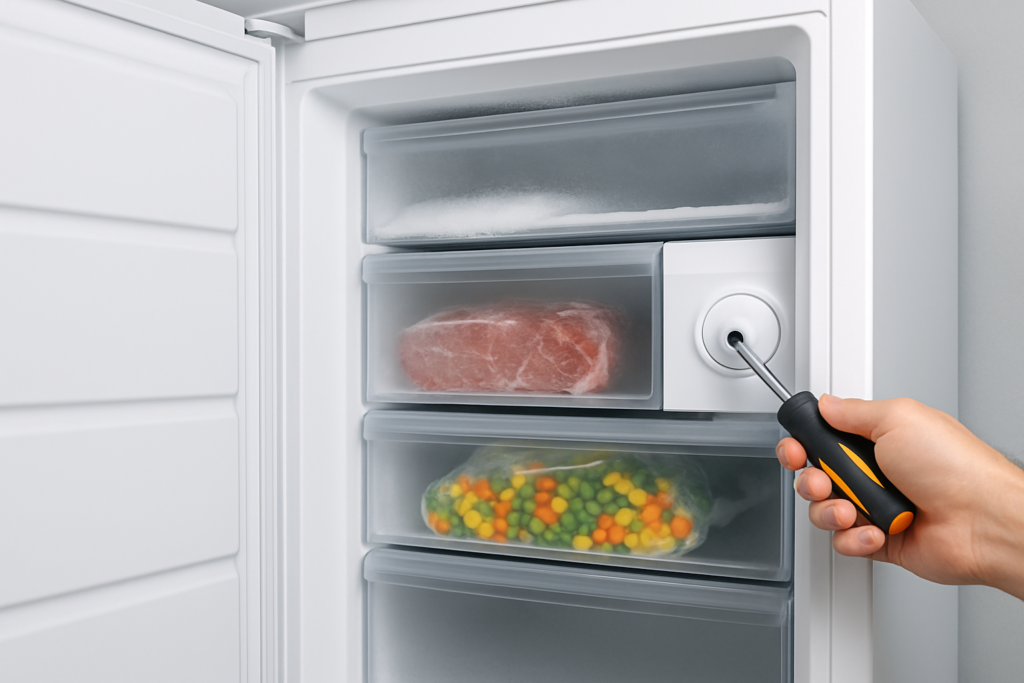
In some cases, the evaporator coils inside the freezer can ice over completely. This happens when the defrost system fails. You’ll need to manually defrost the entire unit by unplugging it and letting the ice melt, which can take 6-8 hours. Place towels around the base to catch water.
Faulty Door Seals Letting Warm Air In
The rubber gasket around your freezer door creates an airtight seal. When it gets cracked, warped, or dirty, warm air sneaks in constantly. Your freezer has to work overtime to compensate, and it may never reach the proper temperature.
Test your door seal with the dollar bill trick. Close a dollar bill in the door and try to pull it out. You should feel resistance. If it slides out easily, your seal isn’t tight enough. Repeat this test around the entire perimeter of the door.
Sometimes you can revive a seal by cleaning it thoroughly with warm soapy water. Built-up grime can prevent proper contact. For genuinely damaged seals, you’ll need a replacement. Search for your freezer’s model number plus “door gasket” to find the right part.
Thermostat and Temperature Control Issues
Your freezer’s thermostat tells the compressor when to turn on and off. When it malfunctions, the compressor might not run long enough to cool properly, or it might not run at all. This is one of the more common electrical failures in older freezers.
First, check that your temperature dial hasn’t been accidentally adjusted. The ideal freezer temperature is 0°F. Use a freezer thermometer to verify the actual internal temperature, since the built-in gauge might be inaccurate.

Digital Freezer Thermometer
Getting accurate temperature readings helps you diagnose whether your freezer is actually malfunctioning.
Testing the thermostat requires a multimeter and some electrical knowledge. You’ll need to access it by removing panels inside the freezer. Many people prefer to replace a suspected faulty thermostat rather than spend time testing, since replacement freezer thermostats are fairly affordable.
Compressor and Refrigerant Problems
The compressor is the heart of your freezer’s cooling system. It pressurizes refrigerant and keeps it circulating through the coils. When you hear that humming sound from your freezer, that’s the compressor running. If it’s completely silent or making unusual clicking or grinding noises, you might have a serious problem.
Compressor failures typically happen gradually. You might notice the freezer struggles to stay cold during hot weather, or it runs constantly without reaching temperature. Sometimes you’ll hear the compressor trying to start but clicking off after a few seconds.
Unfortunately, compressor replacement is expensive and usually requires a professional. The refrigerant system needs to be properly evacuated and recharged, which requires specialized equipment and certification. For many older freezers, replacing the compressor costs almost as much as buying a new unit.
Low refrigerant is another possibility, though modern freezers are sealed systems that shouldn’t lose refrigerant. If yours is leaking, you’ll need professional repair. Signs include frost buildup in strange patterns, oil residue near coils, or a hissing sound.
When to Call a Professional vs. DIY
You can handle most airflow issues, cleaning tasks, and door seal replacements yourself. These fixes don’t require special tools beyond basic household items and maybe a multimeter for electrical testing.
Call a technician when you’re dealing with refrigerant issues, compressor replacement, or complex electrical problems. Also, if your freezer is still under warranty, professional repair might be covered. Check your warranty documentation before attempting DIY fixes that could void coverage.
Consider the age of your freezer too. If it’s over 10 years old and needs major repairs, replacement might make more financial sense. Modern freezers are significantly more energy efficient, which means lower electric bills that can offset the purchase price over time.
Frequently Asked Questions
How long should I wait after plugging in a freezer before it reaches temperature?
A newly plugged-in freezer typically takes 4-6 hours to reach 0°F, though it can take up to 24 hours to fully stabilize. Avoid opening the door during this time, and don’t load it with food until it’s properly cold. Adding room-temperature items before the freezer is ready will extend the cooling time significantly.
Why is my freezer cold but not freezing solid?
This usually means your freezer is running at 15-25°F instead of the ideal 0°F. Common causes include a slightly faulty thermostat, partially blocked vents, or dirty condenser coils reducing efficiency. The freezer works well enough to keep things cold but can’t reach full freezing capacity. Start by cleaning the coils and checking for obstructions.
Can a freezer work too hard and freeze up?
Yes, when the defrost system fails, ice builds up on the evaporator coils until they’re completely encased. This blocks airflow and prevents cooling. The freezer runs constantly trying to compensate. You’ll need to manually defrost the unit and potentially replace the defrost timer, heater, or thermostat depending on which component failed.
This article contains affiliate links. We may earn a small commission at no extra cost to you.