
The first hard freeze of winter can turn your cozy home into a plumbing nightmare faster than you can say “burst pipe.” Frozen pipes aren’t just an inconvenience that leaves you without water for a few hours. They can cause thousands of dollars in damage when they rupture, flooding your basement or destroying walls and flooring.
The good news is that preventing frozen pipes is much easier and cheaper than dealing with the aftermath. With proper preparation and a few key supplies, you can protect your plumbing system from even the harshest winter weather. Most winterization tasks take just a few hours to complete but can save you from major headaches and expensive repairs.
Winter plumbing disasters don’t discriminate based on climate either. Even homes in traditionally warmer regions can experience pipe problems during unexpected cold snaps, since their plumbing systems often lack the built-in freeze protection common in northern climates.
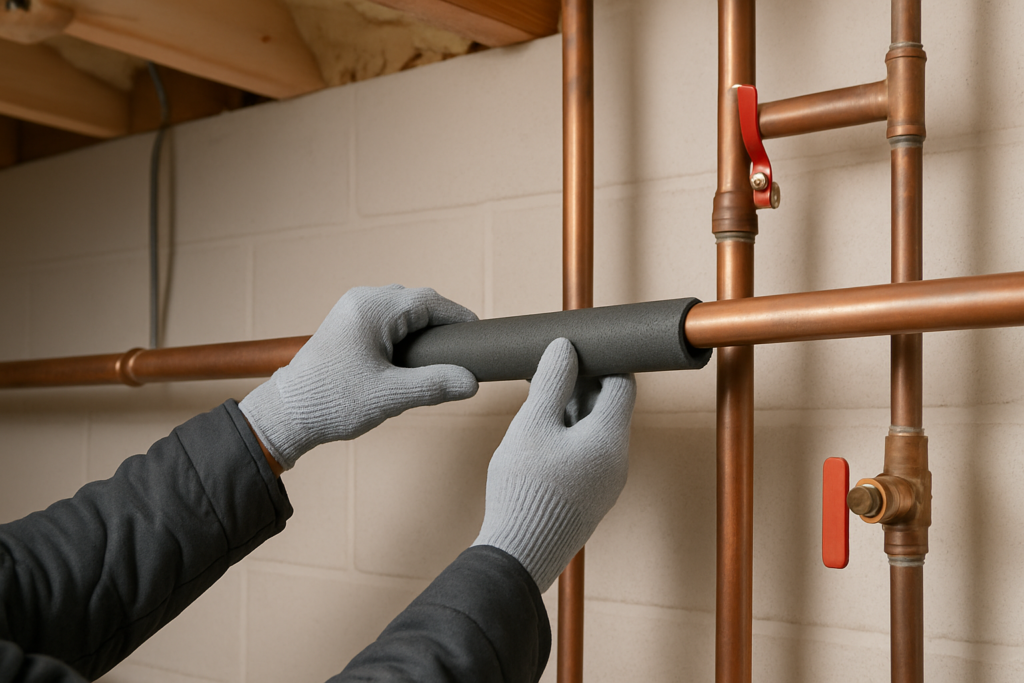
Step 1: Insulate Exposed Pipes
Start your winter prep by identifying and insulating any exposed pipes in unheated areas. These vulnerable spots include basements, crawl spaces, attics, and exterior walls. Pipes in these locations are your biggest freeze risk since they lack the warming effect of heated indoor air.
Focus first on pipes closest to exterior walls or in areas where you’ve felt cold drafts. Water supply lines are more critical to insulate than drain lines since they contain pressurized water that can cause serious damage if the pipe bursts.
For most homes, foam pipe insulation provides excellent protection and is simple to install. The foam tubes slip right over your pipes and can be secured with duct tape. Make sure you buy the correct diameter for your pipes, typically 1/2 inch or 3/4 inch for residential water lines.
Frost King Foam Pipe Insulation
This pre-slit foam insulation makes installation quick and provides reliable freeze protection.
For pipes in extremely cold areas or where you’ve had freeze problems before, consider heat tape or heating cables. These electric heating elements wrap around your pipes and automatically activate when temperatures drop. Always follow the manufacturer’s installation instructions carefully since improper installation can create fire hazards.
Step 2: Drain Outdoor Water Systems
Your outdoor plumbing systems need complete drainage before freezing temperatures arrive. Any water left in outdoor pipes, sprinkler systems, or hoses will expand when it freezes and can crack or burst the lines.
Start by disconnecting and draining all garden hoses. Store them in a garage or basement where they won’t be exposed to freezing temperatures. Don’t forget about hoses connected to secondary locations like pools, RVs, or outbuildings.
Turn off the water supply to outdoor faucets using the shut-off valves inside your home. These valves are usually located near where the pipe passes through your foundation or basement wall. After shutting off the supply, open the outdoor faucet to drain any remaining water from the pipe.
Sprinkler systems require professional draining in most cases. The system needs to be blown out with compressed air to remove all water from the underground lines. Contact a sprinkler service company to schedule this before your first hard freeze. Attempting to drain sprinkler lines yourself without proper equipment often leaves water in the system that can cause expensive damage.
Step 3: Install Outdoor Faucet Covers
Even after draining your outdoor faucets, the faucet itself can still freeze if exposed to wind and extreme cold. Faucet covers provide an extra layer of insulation that prevents the fixture from freezing and protects the pipe connection inside your wall.
Look for covers made from thick foam or insulated fabric rather than thin plastic versions. The cover should fit snugly around the faucet and any attached piping. Most covers attach with drawstrings or Velcro straps.
Duck Brand Outdoor Faucet Cover
These heavy-duty covers provide excellent insulation and are reusable for many seasons.
Don’t forget about less obvious outdoor water connections like washing machine hookups in garages, utility sinks in unheated areas, or water spigots on sheds and outbuildings. These locations are often overlooked but can cause significant problems if they freeze.
Step 4: Seal Air Leaks and Drafts
Cold air infiltration is one of the main causes of pipe freezing, especially for pipes located in exterior walls. Even small air leaks can allow enough cold air inside to freeze pipes during extended cold periods.
Check around areas where pipes enter your home, including where water lines pass through foundation walls or floors. Use expanding foam insulation or caulk to seal gaps around these penetrations. Pay special attention to rim joists in basements and crawl spaces, which are common areas for air leaks.
Inspect windows and doors near plumbing for drafts. Cold air from these sources can affect pipes in nearby walls. Weather stripping and caulking around windows and doors not only helps prevent frozen pipes but also improves your home’s energy efficiency.
Consider temporary measures for extreme cold spells, such as placing foam board insulation against basement walls near water lines or using plastic sheeting to block cold air in crawl spaces. These aren’t permanent solutions but can provide extra protection during unusually harsh weather.
Step 5: Maintain Proper Indoor Temperatures
Consistent heating is your best defense against frozen pipes. Even if you’re traveling during winter, maintain a minimum temperature of 55 degrees Fahrenheit throughout your home. This temperature provides adequate protection for pipes in interior walls while keeping heating costs reasonable.
Open cabinet doors under sinks, especially those on exterior walls. This allows heated air to circulate around the pipes and prevents cold pockets from forming. Kitchen and bathroom cabinets are the most important to keep open since they often contain water supply lines close to outside walls.
During extremely cold weather, consider running faucets at a slow drip overnight. Moving water is much less likely to freeze than standing water. You don’t need a large flow, just enough to keep water moving through the pipes. Focus on faucets connected to pipes in exterior walls or unheated areas.
Regional Temperature Considerations
Your location affects how aggressively you need to heat your home for pipe protection. Homes in northern climates typically have better-insulated plumbing systems and may only need standard heating to prevent freezing. However, homes in southern regions often have more vulnerable pipe layouts since they weren’t designed for extended freezing weather.
If you live in a region that rarely experiences freezing temperatures, be extra vigilant during cold snaps. Your plumbing system likely has pipes in locations that would be better protected in colder climates.
Step 6: Know Your Water Shut-Off Location
Before winter weather arrives, make sure everyone in your household knows where the main water shut-off valve is located and how to operate it. In an emergency, shutting off the water supply quickly can prevent thousands of dollars in flood damage.
The main shut-off valve is typically located near where the water line enters your home, often in the basement, crawl space, or near the water meter. Test the valve during your winter preparation to ensure it turns easily. If it’s stuck or difficult to operate, contact a plumber to service it before you need it in an emergency.
Label the shut-off valve clearly and consider keeping a water meter key or valve wrench nearby if your shut-off requires a special tool. Some municipalities require a special key to operate the street-side valve, which you can purchase at hardware stores.
Water Meter Key
Essential tool for operating most municipal water shut-off valves in emergencies.
Step 7: Prepare Emergency Supplies
Even with proper preparation, pipe problems can still occur during severe weather. Having the right emergency supplies on hand allows you to respond quickly and minimize damage.
Keep a hair dryer or portable heater available for thawing frozen pipes. Never use open flames or high-heat sources like torches, which can damage pipes or create fire hazards. A simple hair dryer is often the safest and most effective tool for thawing accessible frozen pipes.
Stock up on pipe repair supplies including pipe repair clamps, plumbing epoxy, and duct tape. These materials can provide temporary repairs until a plumber can make permanent fixes. Also keep towels, buckets, and tarps available for managing water damage if pipes do burst.
Store the phone numbers for reliable local plumbers and your water utility company in an easily accessible place. During winter storms, plumbers get extremely busy, so having contacts ready can save valuable time when you’re dealing with an emergency.
Step 8: Service Your Heating System
Your heating system is your primary defense against frozen pipes, so make sure it’s operating reliably before cold weather arrives. Schedule a professional HVAC inspection and tune-up if you haven’t had one recently.
Replace your heating system’s air filter and ensure all heating vents are open and unobstructed. Blocked vents can create cold spots in your home where pipes might freeze. Don’t close vents in unused rooms during winter, as this can lead to uneven heating and pipe problems.
If you use a wood stove or fireplace as supplemental heating, ensure you have adequate fuel supplies before winter storms arrive. Power outages during ice storms can disable electric heating systems, making backup heat sources critical for preventing pipe freezes.
Consider installing a backup heating source in areas with vulnerable plumbing, such as basements or crawl spaces. Small space heaters designed for unattended operation can provide extra protection during extreme weather, but always follow safety guidelines for their use.
What to Do If Pipes Freeze
Despite your best preparation efforts, pipes can still freeze during extreme weather. Recognizing the signs early and responding correctly can prevent minor freeze problems from becoming major disasters.
The first sign of frozen pipes is usually reduced water flow or no water from faucets. Check multiple faucets to determine if the problem affects your entire home or just specific areas. If only one faucet is affected, the freeze is likely in a pipe supplying that fixture.
Turn off the water supply to the affected area immediately. Even if the pipe hasn’t burst yet, the expanding ice can cause ruptures as it thaws. Opening the faucet allows water to flow out as you thaw the pipe, reducing pressure buildup.
Safe Thawing Techniques
For accessible pipes, use gentle heat sources like hair dryers, heat lamps, or warm towels. Start heating near the faucet and work toward the frozen section. Never use open flames, blowtorches, or high-temperature heat sources that can damage pipes or create fire hazards.
For pipes inside walls, increase the ambient temperature by turning up your thermostat and using portable heaters in the affected area. Open cabinet doors to allow warm air to circulate around pipes. This method takes longer but is safer than trying to access pipes inside walls.
If you can’t locate the frozen section or thawing attempts aren’t working, call a professional plumber. They have specialized equipment like pipe thawing machines that can safely thaw pipes in inaccessible locations.
Regional Winterization Differences
Your winterization strategy should account for your local climate and typical winter weather patterns. Homes in different regions face unique challenges and require tailored approaches.
In northern climates with consistent winter temperatures, focus on maintaining steady heating and ensuring your insulation systems are in good condition. These regions typically have well-designed plumbing systems, but the extended cold periods require reliable heating and good maintenance.
Southern regions face different challenges, as their plumbing systems often weren’t designed for freezing weather. Homes in these areas may have pipes in exterior walls, crawl spaces, or other vulnerable locations. During cold snaps, these homes need more aggressive protection including dripping faucets and temporary insulation measures.
Mountain and high-elevation areas can experience sudden temperature swings that catch homeowners off guard. These regions benefit from more robust permanent insulation systems and reliable backup heating sources for power outages.
Coastal Considerations
Coastal areas face unique challenges from wind chill and salt air. Wind can dramatically increase the effective cold temperature around your home, making pipe protection more critical even at temperatures above freezing.
Salt air can also accelerate corrosion of outdoor plumbing fixtures, making them more vulnerable to freeze damage. Regular inspection and maintenance of outdoor fixtures becomes even more important in coastal environments.
Frequently Asked Questions
At what temperature do pipes typically freeze?
Pipes can begin freezing when temperatures drop to 32°F, but most home pipes don’t freeze until temperatures reach the mid-20s or lower for several hours. Pipes in unheated areas like basements or crawl spaces can freeze at higher temperatures, especially if there are air leaks allowing cold air infiltration. Wind chill can also make pipes freeze at higher temperatures than still air conditions.
Should I let faucets drip during freezing weather?
Running faucets at a slow drip during extreme cold can help prevent freezing, especially for pipes in exterior walls or unheated areas. You only need a small trickle, not a steady stream. Focus on faucets that are supplied by pipes in vulnerable locations. This technique works because moving water is less likely to freeze than standing water in pipes.
How do I know if my pipes have frozen but not burst?
The main sign of frozen pipes is reduced water flow or no water from faucets. You might also hear unusual sounds when turning on faucets, such as clanking or whistling. Visible frost on exposed pipes is another clear indicator. If pipes have frozen but not burst, you won’t see water damage or hear water running when all faucets are turned off.
Is it safe to use space heaters to prevent pipe freezing?
Space heaters can be safe for preventing pipe freezing if you use models designed for unattended operation and follow safety guidelines. Look for heaters with automatic shut-off features and tip-over protection. Never use extension cords with space heaters, keep them away from flammable materials, and ensure adequate ventilation. Consider ceramic or oil-filled heaters for continuous operation in unoccupied areas.
This article contains affiliate links. We may earn a small commission at no extra cost to you.