
Your vacuum cleaner is one of your home’s hardest-working appliances, but chances are you’re accidentally shortening its life with simple mistakes. Most people think vacuum maintenance means emptying the bag and that’s it. Unfortunately, this limited approach can turn a machine that should last 8-10 years into one that barely makes it past three.
The frustrating part isn’t just the shortened lifespan. These maintenance mistakes also reduce your vacuum’s cleaning power, increase energy consumption, and can even damage your floors and carpets. You might notice your vacuum leaving dirt behind, making strange noises, or overheating during use.
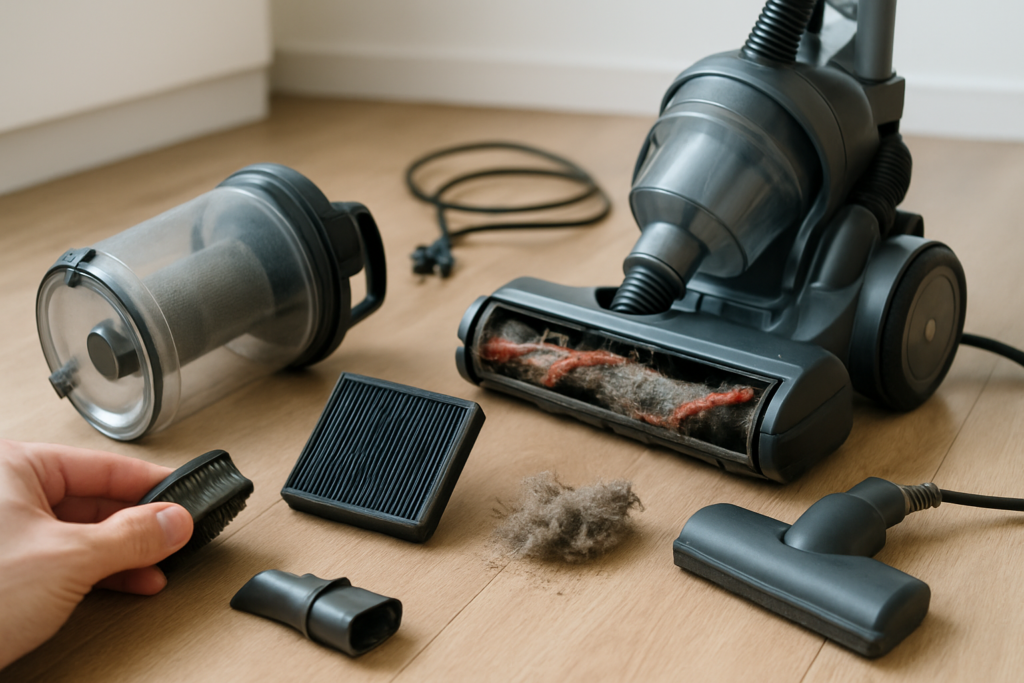
Let’s look at the five most common vacuum maintenance mistakes that are slowly killing your machine and how to fix them before it’s too late.
1. Filter Neglect: The Silent Performance Killer
Your vacuum’s filters are its lungs, and most people completely forget they exist. Every vacuum has at least one filter, and many modern models have two or three different types working together. When these filters get clogged with dust and debris, your vacuum has to work much harder to maintain suction.
Dirty filters force the motor to run at higher temperatures and draw more power. This extra strain shortens the motor’s life significantly. You’ll also notice reduced suction power, which means you end up going over the same spots multiple times, wasting time and energy.
HEPA filters are particularly susceptible to this problem. These high-efficiency filters trap microscopic particles, but they also clog faster than standard filters. A dirty HEPA filter can reduce suction by up to 50% while making your motor work twice as hard.
How to Fix Filter Problems
Check your filters monthly and clean or replace them as needed. Most foam and cloth filters can be washed with warm water and mild soap. Let them dry completely before reinstalling, which usually takes 24 hours.
HEPA filters typically need replacement every 6-12 months, depending on use. Mark your calendar or set a phone reminder. Some models have filter indicator lights that tell you when it’s time for maintenance.
Shark Navigator Replacement Filter Set
Perfect example of affordable replacement filters that keep your vacuum running like new
Keep spare filters on hand so you’re never stuck with a clogged filter when you need to vacuum. Having backups also means you can immediately replace a dirty filter instead of waiting for it to dry after washing.
2. Overstuffed Bags and Full Canisters
Running your vacuum with an overfilled bag or canister is like trying to breathe through a straw. Most people wait until the bag is completely full or the canister is packed tight before emptying it. This common mistake dramatically reduces suction and puts unnecessary stress on your motor.
When a bag gets more than two-thirds full, airflow becomes restricted. Your vacuum compensates by working the motor harder, generating more heat and consuming more electricity. The reduced airflow also means dirt and debris don’t get picked up effectively, leaving your floors less clean.
Bagless canisters have similar issues. When the debris chamber fills up, the cyclonic action that separates dirt from air becomes less efficient. Fine dust starts bypassing the system and can end up back on your floors or in your filters.
The Right Way to Manage Bags and Canisters
Change bags when they’re about 2/3 full, not when they’re bursting. This maintains optimal airflow and suction power. For bagless models, empty the canister when it reaches the maximum fill line, which is usually about halfway up the chamber.
Empty bagless canisters outside or in a well-ventilated area to avoid spreading dust back into your clean space. Tap the canister gently to remove stubborn debris, but don’t bang it aggressively as this can damage the plastic.
Stock up on replacement bags if you use a bagged model. Having the right bags on hand prevents the temptation to overstuff them or use incorrect bag types that don’t fit properly.
3. Ignoring Clogs and Blockages
When your vacuum suddenly loses suction, the culprit is often a clog somewhere in the system. Many people notice the reduced performance but continue using the vacuum anyway, hoping the problem will resolve itself. This approach puts enormous strain on your motor and can cause permanent damage.
Clogs commonly occur in the hose, brush roll area, or the transition points where different components connect. Small objects like coins, hair ties, or pet toys can create partial blockages that gradually worsen over time.
The brush roll is particularly prone to clogs from hair, string, and fabric threads. When the brush can’t spin freely, your vacuum loses its ability to agitate carpet fibers and lift embedded dirt. The motor also works harder trying to turn the blocked brush.
Clearing Clogs Properly
Check for clogs immediately when you notice reduced suction. Start with the hose by removing it and looking through it toward a light source. Use a straightened coat hanger or flexible clog removal tool to gently dislodge blockages.
Inspect the brush roll monthly and remove wrapped hair and debris. Most modern vacuums have removable brush rolls that make this job easier. Cut away hair and string with scissors, but be careful not to damage the bristles.
Don’t forget to check less obvious areas like the connection points between the hose and the main unit, or where attachments connect. These spots can accumulate debris over time and create partial blockages.
Bissell CrossWave Brush Roll
Replacement brush rolls are essential for maintaining optimal cleaning performance
4. Wrong Height Settings Damage Everything
Most people set their vacuum height once and forget about it, but using the wrong height setting damages both your vacuum and your floors. Running a vacuum too low creates excessive friction and can burn out the motor. Setting it too high means poor cleaning performance and unnecessary passes over the same area.
Carpet height varies significantly throughout most homes. Your living room might have low-pile carpet while bedrooms have plush, high-pile carpeting. Hard floors require different settings entirely. Using one height setting for everything forces your vacuum to work inefficiently.
When the height is too low, the vacuum seals too tightly against the carpet, restricting airflow and making the motor work harder. You’ll hear the pitch of the motor change as it struggles to maintain suction. This can overheat the motor and damage both the vacuum and your carpet fibers.
Finding the Right Height Settings
Adjust the height setting for each type of flooring in your home. The vacuum should glide smoothly without excessive resistance. You should feel slight resistance, but it shouldn’t be hard to push.
Start with a higher setting and gradually lower it until you feel the right amount of resistance. The brush should just touch the carpet surface, not press deeply into it. For hard floors, raise the brush completely or use a hard floor setting if available.
Test different settings on a small area first. You’ll know you have the right height when debris is picked up efficiently without excessive effort to push the vacuum.
5. Improper Storage Ruins Internal Components
How and where you store your vacuum affects its longevity more than most people realize. Storing a vacuum in damp areas like basements or utility rooms can cause metal components to rust and electrical connections to corrode. Temperature extremes also damage rubber seals and plastic parts.
Wrapping the cord too tightly around the vacuum puts stress on the internal wiring. Over time, this can cause breaks in the wiring that create intermittent power issues or complete failure. Coiling the cord under tension is particularly harmful.
Storing your vacuum with a dirty bag or full canister creates odor problems and can promote mold growth. The moist environment inside a used vacuum bag is perfect for bacteria and mold, especially if the bag contains any liquid spills.
Proper Storage Techniques
Store your vacuum in a clean, dry area with stable temperatures. Avoid garages, basements, or other areas with high humidity or temperature swings. A hall closet or utility room with climate control is ideal.
Wrap the cord loosely without putting tension on it. Many vacuums have cord hooks or storage systems designed to hold the cord properly. Don’t force the cord into tight coils or bend it sharply.
Empty the bag or canister before long-term storage. Clean or replace filters and let everything dry completely. This prevents odors and mold while ensuring your vacuum is ready for immediate use next time.
SimpleHouseware Broom and Mop Holder
Proper wall storage keeps your vacuum off the ground and prevents damage from moisture
Creating a Simple Maintenance Schedule
Regular maintenance doesn’t have to be complicated or time-consuming. A simple schedule prevents most of these common mistakes and extends your vacuum’s life significantly.
After each use, empty bags or canisters that are more than half full. Check the brush roll for obvious tangles and remove any large debris. Store the vacuum properly with the cord loosely coiled.
Monthly tasks include checking and cleaning filters, inspecting the hose for clogs, and thoroughly cleaning the brush roll. This is also a good time to check that height settings are appropriate for different areas of your home.
Every six months, deep clean all washable components and replace filters that can’t be cleaned. Check for wear on belts, brushes, and other replaceable parts. This preventive approach catches problems before they damage your vacuum.
Signs Your Vacuum Needs Professional Service
Some problems require professional repair rather than DIY fixes. Recognizing these signs early can save you from more expensive repairs or premature replacement.
Strange noises like grinding, squealing, or rattling often indicate worn bearings, damaged belts, or loose internal components. While belt replacement is usually simple, other mechanical issues need professional diagnosis.
Electrical problems like intermittent power, burning smells, or sparking require immediate attention. Don’t continue using a vacuum with electrical issues as this creates safety hazards and can cause fires.
Loss of suction that persists after cleaning filters and clearing clogs might indicate motor problems or internal damage. Professional service can determine if repair is cost-effective compared to replacement.
Frequently Asked Questions
How often should I replace my vacuum filters?
Standard filters typically need replacement every 3-6 months with regular use. HEPA filters last 6-12 months depending on your home’s dust levels and pet situation. Washable filters can last years if properly maintained, but should be replaced if they tear or lose their shape after washing.
Can I use my vacuum without a filter temporarily?
Never run your vacuum without filters installed. This allows dust and debris to reach the motor, causing rapid damage and voiding your warranty. If your filter needs washing, wait for it to dry completely or use a spare filter instead.
Why does my vacuum smell bad even after emptying it?
Bad smells usually come from dirty filters, accumulated debris in the brush roll area, or mold growth in moist environments. Clean or replace filters, thoroughly clean the brush roll and housing, and ensure the vacuum is completely dry before storage. Persistent odors might indicate the need for professional cleaning or component replacement.
How do I know if my vacuum belt needs replacement?
Signs of belt problems include reduced brush roll action, burning rubber smell, or visible stretching and cracking on the belt itself. Most belts should be replaced annually with regular use, or immediately if you notice any of these warning signs. A broken belt will prevent the brush roll from spinning entirely.
This article contains affiliate links. We may earn a small commission at no extra cost to you.