Your vacuum cleaner works hard to keep your home spotless, but when was the last time you gave it the deep cleaning it deserves? A dirty vacuum doesn’t just smell unpleasant. It loses suction power, spreads dust instead of collecting it, and can even break down prematurely.
Most people empty the canister or change the bag and call it maintenance. But your vacuum needs much more attention to perform at its best. Hair wraps around brush rolls, filters clog with fine particles, and debris builds up in hidden corners of the machine.
This complete guide walks you through every step of deep cleaning your vacuum, from disassembly to sanitization. You’ll learn specific techniques for different vacuum types and discover how often each component needs attention.
Why Deep Cleaning Your Vacuum Matters
A well-maintained vacuum can last 8-12 years, while a neglected one might die after just 3-5 years. The difference comes down to regular deep cleaning that prevents damage and maintains performance.
Clogged filters force your vacuum’s motor to work harder, leading to overheating and premature failure. Hair and string wrapped around brush rolls create resistance that strains the belt and motor. Accumulated debris in hoses and attachments reduces airflow and suction power.
Beyond performance issues, dirty vacuums become health hazards. They can harbor bacteria, mold, and allergens that get blown back into your air. Pet owners especially need to stay on top of vacuum maintenance to prevent odors and allergen buildup.
Essential Supplies for Deep Cleaning
Before you start, gather these cleaning supplies. Having everything ready makes the process much smoother.
- Microfiber cloths for wiping down surfaces
- Soft-bristled brush for scrubbing components
- Scissors or seam ripper for cutting tangled hair
- Compressed air for blowing out debris
- Mild dish soap for washing parts
- Disinfectant spray for sanitizing
- Paper towels for drying
You’ll also want to work in a well-lit area with plenty of space to lay out parts. A garage or basement works well, especially since this process can be messy.
Shark Navigator Lift-Away Professional NV356E
Popular upright model that’s easy to disassemble and maintain at home
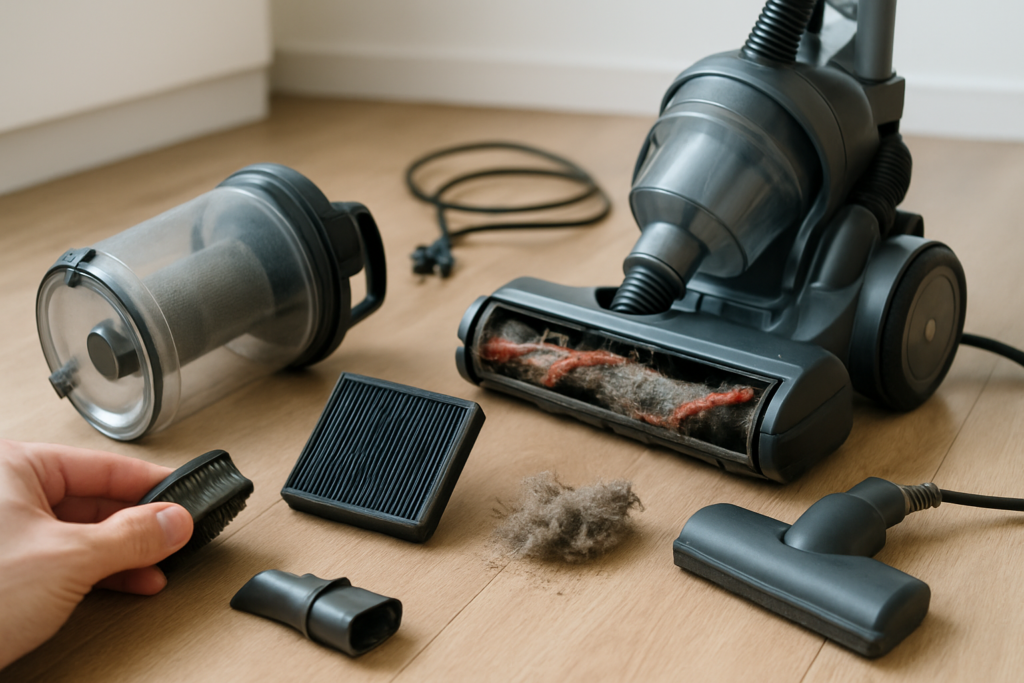
Step-by-Step Disassembly Process
Start by unplugging your vacuum and removing any attachments. Take photos as you disassemble components. This makes reassembly much easier later.
Remove External Components First
Take off the canister or bag, then remove the brush roll cover. Most models have clips or screws holding this cover in place. Set screws aside in a small bowl so they don’t get lost.
Pull out the brush roll next. Many models allow you to lift it straight out, while others require removing end caps first. Check your manual if you’re not sure about your specific model.
Remove any additional attachments like hose connections, extension wands, and cleaning tools. These often twist or clip off easily.
Access Internal Components
Locate and remove all filters. Most vacuums have multiple filters in different locations. Check near the motor, in the canister area, and at the exhaust. Some models have up to four separate filters.
Remove the hose by twisting counterclockwise or pressing release tabs. Check both ends of the hose, as connections can vary between models.
Don’t disassemble the motor housing unless you’re experienced with small appliances. This area requires special care and can void warranties if handled improperly.
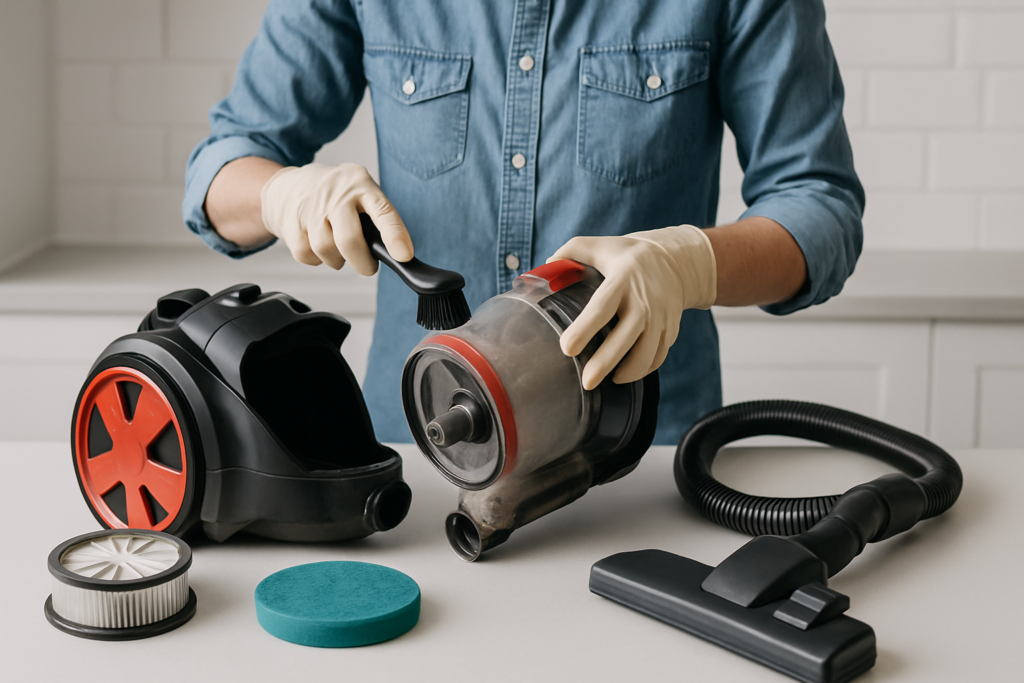
Deep Cleaning Each Component
Cleaning the Canister or Bag Chamber
Wash plastic canisters with warm, soapy water. Scrub away any stuck-on debris with your soft brush. Rinse thoroughly and dry completely before reassembling.
For bag-style vacuums, vacuum out the bag chamber and wipe down all surfaces with a damp cloth. Check for tears or damage that might let debris escape.
Sanitize both types with disinfectant spray, paying special attention to areas that contact debris directly. Let the sanitizer sit for the recommended contact time before wiping clean.
Filter Maintenance and Replacement
Filters need different treatment depending on their type. Foam and cloth filters can usually be washed, while HEPA and paper filters typically need replacement.
Wash reusable filters in cool water without soap initially to remove loose debris. Then wash again with mild dish soap, rinse thoroughly, and squeeze gently to remove excess water. Never wring or twist filters, as this can damage the material.
Let washable filters air dry completely. This can take 24-48 hours depending on humidity. Installing damp filters can cause mold growth and motor damage.
Bissell CrossWave Pet Pro All in One Wet Dry Vacuum
Great option for homes with pets that need frequent deep cleaning
Replace disposable filters according to manufacturer recommendations. HEPA filters typically last 6-12 months with normal use, while pre-motor filters might need replacement every 3-6 months.
Brush Roll Deep Clean
The brush roll collects more hair and string than any other component. Use scissors to carefully cut away wrapped material, working from one end to the other.
Remove the brush roll completely if possible. Wash the roller in warm, soapy water and scrub away any remaining debris. Check for bent or damaged bristles that might need attention.
Clean the brush roll housing thoroughly. Hair and debris often accumulate in the corners where the brush spins. Use your soft brush and compressed air to remove stubborn buildup.
Check the belt while you’re working in this area. Replace it if you notice cracks, stretching, or fraying. A worn belt reduces brush roll effectiveness and can break unexpectedly.
Removing Clogs and Blockages
Clogs typically occur in predictable locations. Check the hose connections first, as these narrow points catch large debris easily.
Disconnect the hose and look through both ends. Use a flashlight to spot blockages, then push them out with a straightened coat hanger or pull them out by hand.
Check the brush roll area next. Remove the brush roll and look for debris stuck in the housing. Small toys, socks, and large pieces of paper commonly cause blockages here.
Don’t forget about attachment clogs. Extension wands and cleaning tools can harbor hidden blockages that reduce suction. Disassemble these components and clean them individually.
Dealing with Stubborn Blockages
Some clogs resist normal removal techniques. Try these approaches for tough blockages:
- Use compressed air to blow clogs backward through the system
- Soak removable parts in warm water to soften stuck debris
- Tap gently on hoses and tubes to dislodge loose material
- Use a wet/dry shop vacuum to suck clogs out from the opposite direction
Avoid using excessive force, which can damage delicate components. Patient, gentle work removes most clogs without causing harm.
Sanitizing and Disinfecting
Deep cleaning isn’t complete without proper sanitization. This step eliminates bacteria, mold, and odors that regular cleaning might miss.
Use EPA-approved disinfectants on all hard surfaces. Spray thoroughly and allow the recommended contact time. Most disinfectants need 30 seconds to 2 minutes to work effectively.
Pay special attention to areas that contact debris directly. The canister, brush roll housing, and hose connections need thorough disinfection.
Hoover Linx Signature Stick Cordless Vacuum
Lightweight cordless model that makes maintenance and cleaning much easier
For odor control, sprinkle baking soda in the canister and let it sit for several hours before vacuuming it out. This natural deodorizer eliminates persistent smells without harsh chemicals.
Vacuum Type-Specific Instructions
Upright Vacuum Maintenance
Upright vacuums typically have the most complex brush roll systems. Remove the bottom plate to access the brush roll and belt. Clean hair from both the brush and the metal posts it spins on.
Check the height adjustment mechanism while you’re working. Debris can prevent proper height changes, reducing cleaning effectiveness on different carpet types.
Upright models often have edge-cleaning brushes that need attention. Remove these small brushes and clean them separately, checking for damage or excessive wear.
Canister Vacuum Care
Canister vacuums separate the motor and collection areas, making some maintenance easier. Clean the connection points between the canister and hose thoroughly, as these areas collect fine dust.
Check the cord retraction mechanism if your model has one. Debris can interfere with smooth cord operation and potentially damage internal components.
Many canister models have additional filters in the exhaust area. Don’t forget to check and clean these often-overlooked components.
Stick and Cordless Vacuum Maintenance
These lightweight models need frequent maintenance due to their smaller debris capacity and filters. Empty the dust cup after every use and check filters weekly.
Battery-powered models benefit from complete discharge and recharge cycles occasionally. This helps maintain battery life and performance.
Check for blockages in the narrow tubes and connections. These compact designs are more prone to clogs than larger models.
Robot Vacuum Deep Cleaning
Robot vacuums need maintenance after every few cleaning cycles. Remove and clean the brush rolls, side brushes, and sensors regularly.
Clean the charging contacts with a dry cloth to ensure proper battery charging. Dirty contacts can prevent the robot from charging correctly.
Wipe down the sensors with a slightly damp cloth. Clean sensors help the robot navigate effectively and avoid obstacles.
Proper Reassembly Techniques
Reassembly requires attention to detail and patience. Rush this step and you might end up with leftover parts or reduced performance.
Start with internal components first. Install filters in their proper locations, ensuring they’re completely dry and correctly oriented. Many filters only fit one way, so don’t force them if they resist.
Reinstall the brush roll next, making sure it spins freely. Replace the belt if you removed it, stretching it over the motor pulley first, then the brush roll.
Reconnect hoses and attachments, checking that all connections are secure. Loose connections cause suction loss and poor performance.
Testing After Reassembly
Before putting your vacuum back into regular service, run a quick test to ensure everything works properly.
Turn on the vacuum and listen for unusual noises. Grinding, squealing, or rattling sounds indicate something isn’t installed correctly.
Test the suction by holding your hand over the hose end. You should feel strong, consistent airflow. Weak suction suggests a blockage or loose connection.
Run the vacuum over a small test area to check brush roll operation and overall performance. Make any necessary adjustments before full use.
Cleaning Frequency Recommendations
Different components need attention on different schedules. Following these guidelines keeps your vacuum running optimally:
After every use: Empty canister or replace bag when 2/3 full
Weekly: Quick visual inspection of brush roll for hair and debris
Monthly: Clean pre-motor filters, check for obvious clogs, wipe down exterior
Every 3 months: Deep clean brush roll, wash reusable filters, sanitize canister
Every 6 months: Complete disassembly and deep cleaning, replace disposable filters
Annually: Professional service check, replace worn parts, deep maintenance
Homes with pets, heavy carpeting, or high dust levels might need more frequent maintenance. Adjust the schedule based on your specific conditions and usage patterns.
Troubleshooting Common Issues
Even with regular maintenance, vacuums can develop problems. Recognizing common issues helps you address them quickly.
Loss of suction usually indicates clogged filters, full canisters, or blockages in hoses. Work through these possibilities systematically to identify the cause.
Strange odors often come from dirty filters or accumulated organic debris. Deep cleaning and sanitizing typically eliminate most odor problems.
Poor brush roll performance might indicate a worn belt, clogged brush, or height adjustment issues. Check these components when your vacuum isn’t picking up debris effectively.
Dyson V15 Detect Absolute
Premium cordless option with excellent filtration and easy maintenance features
When to Replace vs. Repair
Sometimes deep cleaning reveals damage that requires professional attention or replacement. Knowing when to repair versus replace saves money and frustration.
Replace your vacuum if the motor shows signs of failure, such as burning smells, excessive heat, or intermittent operation. Motor replacement typically costs more than buying a new vacuum.
Cracked canisters or housings that affect suction also warrant replacement. While some cracks can be repaired temporarily, they usually indicate overall wear that will continue causing problems.
Consider replacement if multiple components need attention simultaneously. The cost of replacing filters, belts, brush rolls, and hoses can approach the price of a new vacuum.
Frequently Asked Questions
How often should I deep clean my vacuum?
Plan on deep cleaning your vacuum every 3-6 months, depending on usage. Homes with pets, multiple carpeted rooms, or high dust levels need more frequent deep cleaning. Light users in mostly hard-floored homes can stretch this to every 6 months.
Can I wash HEPA filters?
Most HEPA filters are not washable and should be replaced according to manufacturer recommendations. However, some vacuums have washable HEPA-style filters. Check your owner’s manual or look for washing instructions printed on the filter itself. When in doubt, replace rather than risk damaging the filtration system.
Why does my vacuum smell after cleaning?
Persistent odors after deep cleaning usually indicate incomplete drying of washed components or missed organic debris. Make sure all washable parts are completely dry before reassembly. Check for pet hair or food particles in hard-to-reach areas. Sometimes replacing old filters eliminates stubborn odors that cleaning cannot remove.
What should I do if my vacuum loses suction after deep cleaning?
Post-cleaning suction loss typically results from incorrect reassembly or damp filters. Double-check that all components are properly installed and connections are secure. Ensure filters are completely dry before installation. If problems persist, systematically check for blockages you might have missed during the cleaning process.
Regular deep cleaning transforms vacuum performance and extends equipment life significantly. The time investment pays off through better cleaning results, fewer repairs, and healthier indoor air quality. Your vacuum works hard for you. Return the favor with proper maintenance, and it will serve you well for years to come.
This article contains affiliate links. We may earn a small commission at no extra cost to you.